Speaker CabinetPlans + Walkthrough |
Version | 1.0.0 | |
|---|---|---|---|
| Updated | |||
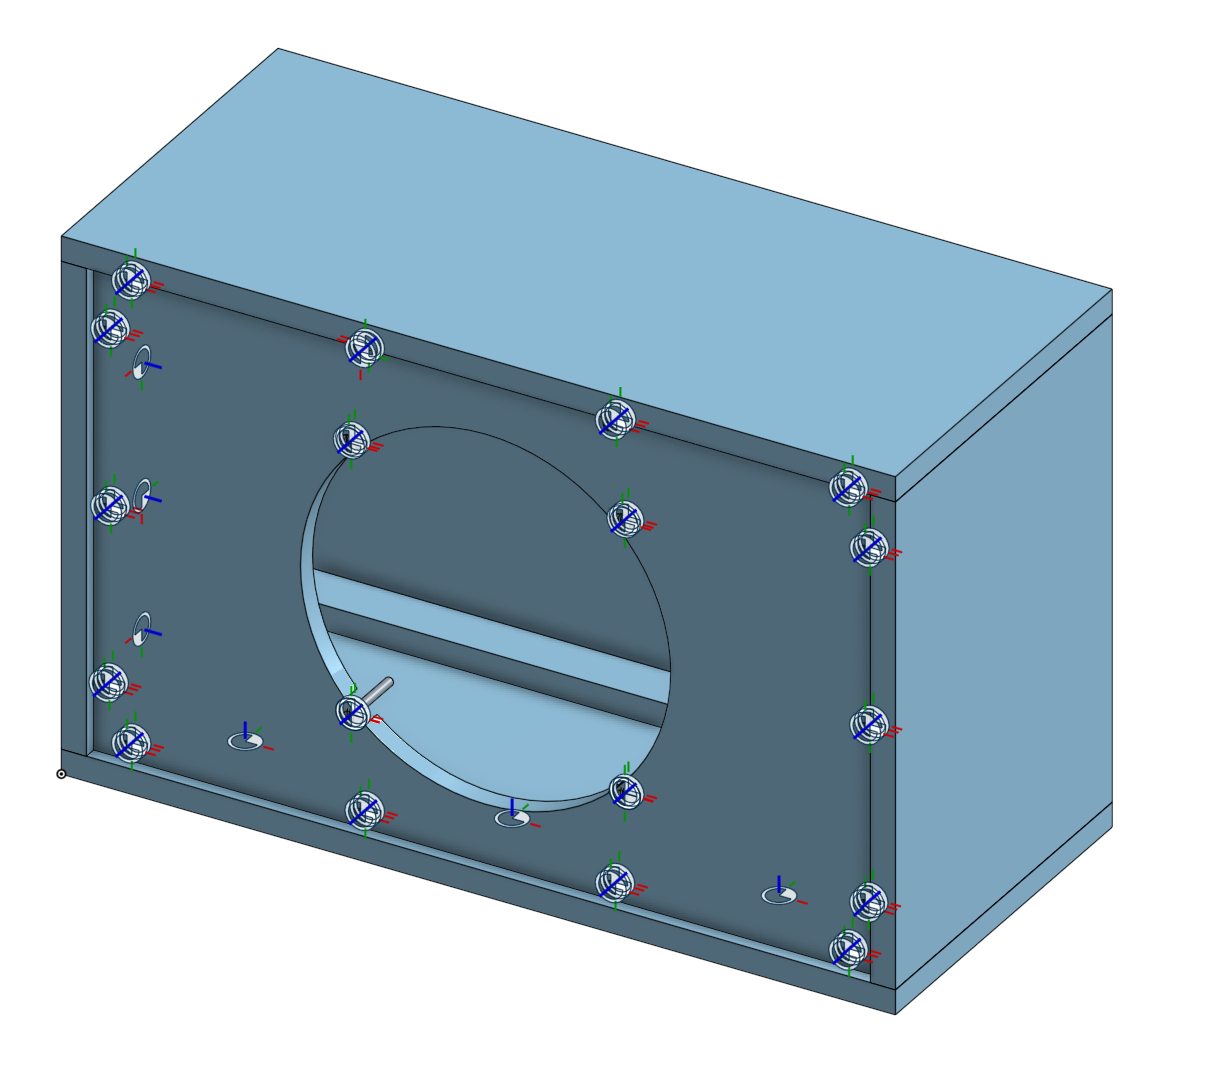
For a clearer picture of how the pieces fit together, here’s the Onshape CAD assembly for the cabinet:
There’s a ton of design work that can go into building guitar cabinets like is done for Hi-Fi speakers, with things like Thiele-Small parameters and using the Golden Ratio for the enclosure dimensions. I spent a while looking into all of this, but it seemed like the lo-fi and non-linear nature of guitar speakers means that, at least for a closed-back cabinet that I was looking to build, the dimensions of the cabinet did not matter much.
With that in mind, I still opted to start with a golden ratio design and then work from there to make the cabinet easy to build. I wanted the cabinet to be 25” wide to match the amp head I built previously, and I calculated the other dimensions from there. Setting 25” as the long dimension, this gives dimensions of
Though the 25” measurement was an external one, I wanted to ensure that there was at least 9” of internal depth to give the speaker plenty of room relative to the input jack. This fit well with using a pine 1x12 (actual 3/4” by 11 1/4”) for the frame.
Though internal volume is the number that actually makes a difference in the speaker response, it was easy enough to calculate the external volume and use that as a point of comparison to other popular 1x12 extension cabinets. The above specs result in an external volume of 4394 in^3, which is less than the huge closed back 1x12 from Emperor, but also a decent bit larger than the Bogner Cube (although that’s ported for additional low end response). A large cabinet might have resulted in a slightly better bass response but again, these things don’t seem to make much of a difference for guitar speakers and the midrange focus of electric guitar.
Cut the 1x12x8’ board into sections of
Assemble the four boards as the frame of the cabinet with the sides sandwiched between the top and bottom.
Cut the 1x2 furring strips into sections of
Drill 3 clearance holes (for the 1” wood screws) through the 2” width of each of the furring strips. The exact location of these holes doesn’t make that much of a difference, it’s just necessary to check before installing the baffle and back plates that their screws won’t hit these mounting screws.
Join the front’s furring strips to the frame with the 1” wood screws, set back from the edge of the frame such that there is 1” between the edge of the frame and the furring strip. I didn’t use pilot holes for these furring strips, just drive the screws through the clearance holes.
Apply the same process for the back’s furring strips, setting them back 5/8” instead of 1” like for the front.
Cut 2, 23 1/2” x 14 1/8” sections of the plywood. Set one section aside for the back.
Use a compass to sketch a 11.1” diameter circle on the center of the baffle. Use a jigsaw to remove this circle of wood.
Line your speaker up with the baffle hole, ensuring that the speaker mount holes have sufficient material outside the baffle hole. Mark these holes, remove the speaker, and drill clearance holes for the 1/4-20 bolts.
Place the baffle into the frame against the furring strips. Drill clearance holes for the #10 bolts through the baffle and the furring strips. I put 4 bolts along the top and bottom of the baffle and 3 on each side. This might be overkill, I’m not sure.
Remove the baffle, and counterbore each of the holes to 1” diameter and about 3/8” depth. I used a drill press for this to prevent the bit from walking as much. There may not be enough material on most of the holes to prevent a side of the counterbore hole from being open to the outside of the piece or the baffle hole, this is alright.
Capture the 4 1/4-20 bolts for the speaker mount, and the 14 #10 bolts for the baffle mounting, in the counterbore holes in the baffle using their associated nuts + washers.
Once all of the bolts are captured on the baffle, apply grill cloth over the front (bolt head side) of the baffle. I put a coat of black spray paint on this side first before applying the grill cloth to make it harder to see the plywood through the cloth, but up to you on whether that will make a difference. I fastened the grill cloth with a staple gun.
Place the baffle in its holes in the front of the frame. This might require a bit of work with a rubber mallet to get it to line up properly. Use 14 more of the #10 nuts and washers to fasten the bolts from the inside of the cabinet.
Attach the speaker to its 4 mounting bolts with the remaining 1/4-20 nuts. Attach the 1/4” jack with a spade connectors or solder.
Place the back in the frame. Drill pilot holes into the furring strips. I used a similar 14 hole pattern as with the baffle. Remove the back, drill clearance holes for the 1” wood screws and a clearance hole for the 1/4” jack. Place the back in the frame again, attaching the 1/4” jack and driving in the wood screws.
The method for attaching the handles will differ by the model you choose. For the handles I linked above, I measured the indent and removed that amount of wood from the sides using a jigsaw.